Screen and Soft Light blend modes
A friend wrote to me and asked my opinion on the use of Screen and Soft Light layer blend modes for editing. Not surprisingly, I have an opinion, and a firm one.
Screen mode is habitually used to lighten an image (or part thereof), and Soft Light mode to add midtone contrast.
I don’t consider them terrible. Neither one introduces channel clipping, so they’re certainly not dangerous; so if you like using them, I can’t rightly stop you.
However, I find them very clumsy and arbitrary, and they don’t provide as much control as alternative methods.
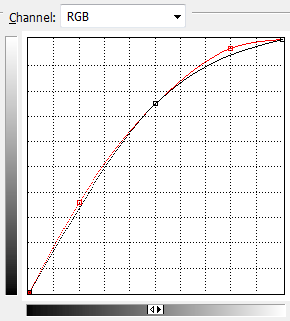
First, consider Screen mode. It gives roughly the equivalent of a midtone adjustment in either Curves or Levels. In fact, a simple test reveals that if you use a Curves adjustment to mimic a Screen layer, it looks like this:

In fact, if I turn that curve red for a moment, and compare it with a regular Curves midtone bump, you’ll see it’s almost identical – just a little brighter near the highlight end:

Ok, Damien, if they’re so similar, what’s your problem with using a Screen layer?
Well, the control is so limited. If you use a Screen layer, and it brightens the midtones too much, you can reduce the layer opacity – that’s ok. But if it doesn’t brighten them enough, you have to make a whole new screen layer! Then it’s probably too much, so you have to reduce the opacity of that layer … it’s a debacle!
Just make one Levels or Curves layer, and enjoy infinite control right there in front of you.
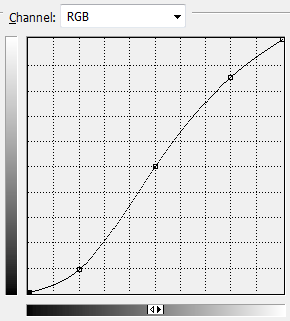
Now, Soft Light. First, let’s take a look at what it does:

That’s right, it is the equivalent of an S-curve. A slightly bottom-heavy S-curve, as it turns out.
Remember my gripe about Screen? Well, the same applies here. The strength of the adjustment is limited, and if you need more, you need to duplicate it. It’s clumsy and time-wasting, when you consider the simplicity of making a Curves adjustment instead.
But it gets worse. Not only do you have limited control over the strength of the adjustment, you have zero control over the light/dark balance. What if your photo’s darker tones are already dark enough, and you want a midtone contrast adjustment that particularly targets lighter tones?
Take a look at this Curves adjustment:

See how the shadow end has hardly moved at all, and the highlight end is getting the main strength of the adjustment? You simply cannot replicate that kind of exquisite control using an arbitrary Soft Light layer.
I hope I’ve made my point.
(Actually, in most cases, I consider any kind of S-curve adjustment as clumsy and unnecessary, but that’s a topic for another post.)
One more thing … if you use Blend Modes for your editing (and I haven’t managed to convince you otherwise), and you’re one of the many people who use Ctrl J to duplicate their layer then change the mode, I strongly recommend following these steps:
- Raise your right hand to about head height.
- Keeping your elbow low, pivot your arm away from your body
- Strike yourself with a firm open-handed slap across the cheek.
Duplicating a pixel layer is completely unnecessary, and in fact counter-productive. It increases your file size, and doesn’t have a handy layer mask attached.
It’s much better to simply make an adjustment layer (any one, it doesn’t matter) then change the blend mode of that layer without actually making any adjustments.
Using an adjustment layer for this purpose barely increases your file size at all; and it has a built-in layer mask all ready to use if required.
