
Printing big? Test small first
Getting a really big print done for the first time is as scary as hell, isn’t it? It’s really expensive, and you’re afraid that you’ll blow your dough because the shot isn’t good enough, or your camera doesn’t have enough megapixels.
First, I want to point you to my article here: How big can I print my photo? You’ll find it puts your mind at ease.
Secondly, I want to talk about the practical solution – getting a small test print done first. Taking a small centre crop of the full-size image is a very cheap way to see how your large print will turn out.
Step One: The usual stuff
Edit your photo in the normal way. Save it as a PSD (or whatever), and don’t crop or resize it at all. That’s your master file. Don’t sharpen it – that’s vitally important.
Step Two: Resize for print
Prepare your file for printing big. Resize it to the desired size (let’s say 20×30") at the resolution recommended by your lab (eg 300ppi). Flatten the layers, too, if necessary. Don’t sharpen yet!
Step Three: Take a centre crop
Decide what size test print you’d like. Obviously a 6×4 is cheapest, but is that enough? Maybe a 5×7 or an 8×10 is better, to show you more of the image. Choose the biggest test size you think you can afford, without blowing the budget.
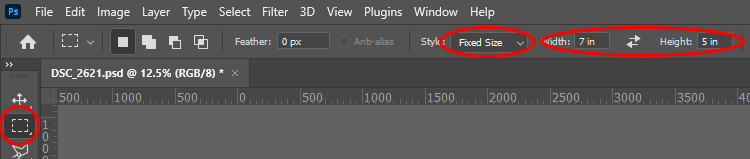
Choose your Marquee Tool, set it to "Fixed Size" and enter the size of your intended test print:
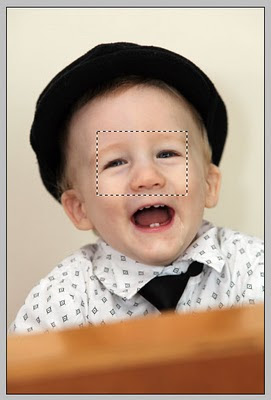
Click in the image to draw the marquee, then drag it to where you want it (usually eyes, if it’s a portrait):
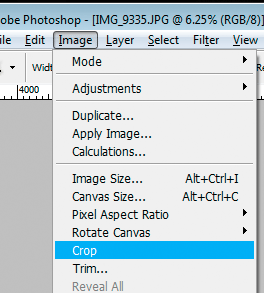
Choose "Crop" from the Image menu:
And there you have it! A real-size centre-crop test print.
Step Four: Sharpen
Sharpen as you would for the full-sized large print. (This class will rock your sharpening world, I promise!)
Step Five: Save ’em and send ’em
Save the test print files as jpegs, and send them off to the lab. Go and spend some time with loved ones for a day or so until they come back.
Step Six: Evaluate
When you get the test prints back, it’s time to see how they look.
ULTRA IMPORTANT: For heaven’s sake, don’t examine them up close like you would a normal small print. Stick them to the wall and take a few paces back, and evaluate them the way you’d evaluate the magnificent large print. Pixel-peepers never got any joy from rubbing their noses on a large print, I assure you.
Step Seven: Print the big one, and bask in the glory!
Send the big file off to print, and wait eagerly for it to be ready. Trust me, you’ll love it!!!