
Raw noise removal
One of the golden rules of editing is to do as much in Raw as possible before moving into Photoshop, and noise removal is no exception. Noise must be removed in raw, because if you wait until later, the damage to your file has already been done.
(This article is written using screenshots from Adobe Camera Raw, but applies equally to Lightroom.
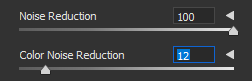
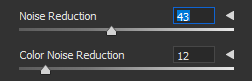
There are two main controls for noise removal, which are now called "Noise Reduction" and "Color Noise Reduction". (Previously they were named "Luminance" and "Color".) The default values for the sliders are 0 and 25 respectively:

Types of noise
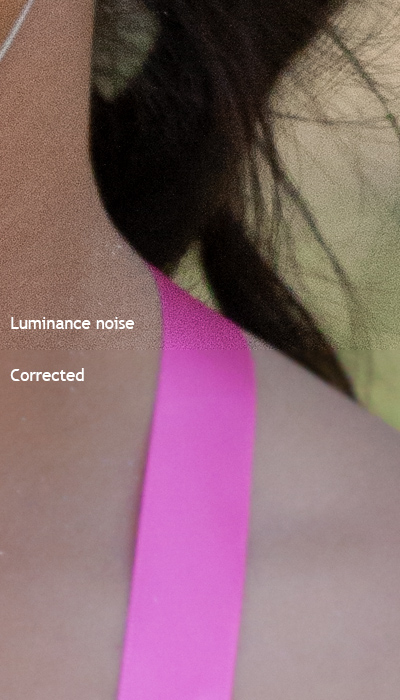
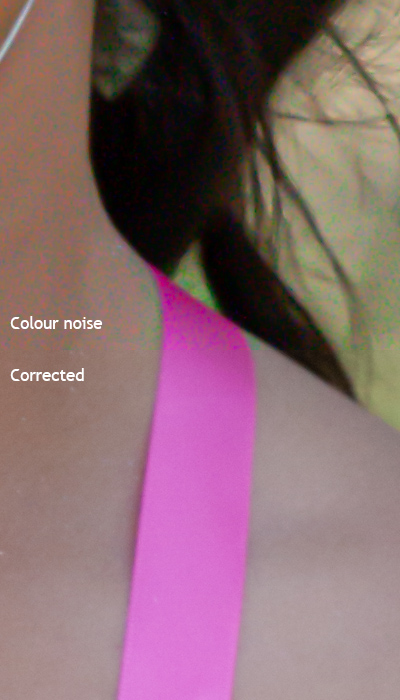
It's important to understand the difference between Luminance noise (now just called "Noise" by Adobe) and Color noise.
- Luminance noise is what we think of when we usually think of noise – graininess. Here’s a close-up example of luminance noise:
- Colour noise is that underlying speckled colour (usually red and green, but can be blue as well) that is sometimes visible "below the surface" so to speak. Here’s an exaggerated example:
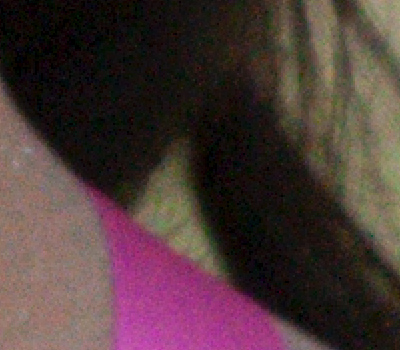
- Of course, most photos have some of both types of noise:
Slider settings
As I mentioned earlier, the Adobe defaults for these sliders are 0 for luminance noise, and 25 for colour noise. I’ve always found these to be appalling settings. 0 is almost always too low for luminance, and 25 is invariably too high for colour.
There is, of course, risk involved in noise removal. There’s a point at which noise removal becomes detail removal. So of course we can’t just crank the sliders recklessly to their maximum setting – that might kill some nice detail in our images. It’s not such a problem for luminance noise removal, because even an inexperienced eye can tell when the removal is too strong, and bring it back a bit. But the damage caused by too much colour noise removal is much less obvious, and I frequently see examples of images being robbed of "good colour" because of that horrid default setting of 25 on the Color noise slider. I’m here to tell you that a much lower setting is usually suitable.
It’s very difficult to tell at a glance which type of noise, and how much, is in an image. Colour noise is particularly hard to manage. But I’ve found a simple step-by-step process which gives me the best possible results every time.
The procedure
Step 1: Do your normal tonal edits first
Don’t worry about noise at first. When you initially open your raw file, concentrate on the usual stuff – white balance, exposure, etc. It’s easy to misjudge the severity of noise if the exposure isn’t right.
Step 2: View at 100%
Use the Zoom Tool to enlarge your view to 100%. You must never assess or adjust noise at anything but an up-close view.
Important note: Super-high resolution screens (eg Apple’s Retina) are becoming far more common. If you have one of these screens, where the individual pixels are incredibly tiny, you might need to habitually zoom into 200% or even higher, to perform your noise removal.
Then use the Hand Tool to move the image around so you can see a suitably noisy area. Noise is most prominent in shadows, so choose a moderately dark area to view.
Step 3: Access the noise removal sliders
They are in the Detail section of your raw program.
Step 4: Set the sliders to 100/0
Set the luminance noise slider to its maximum setting, and the colour noise slider to its minimum setting:

In a lot of cases, this is likely to be too much luminance noise removal, making things ridiculously smooth. It’s also likely to exaggerate the colour noise. That’s exactly what you want at this stage. By temporarily taking the luminance noise out of the equation, it allows you to make the best possible judgement call about the colour noise.
Step 5: Gradually increase the colour noise slider
Starting at 0, increase the colour noise removal by 1% at a time (I use the arrow key for this). The goal is to go just far enough to remove the colour noise, and no further. Remember, too much colour noise removal starts to impact the good colour in your pixels.
Step 6: Gradually decrease the Luminance noise slider
From 100, bring the luminance noise slider down to a satisfactory level.
On noisy photos, you might hardly be able to lower this slider at all. On very clean photos, you’ll be able to lower it a long way. Lower it until you see some noise appear, then raise it again a bit, to remove the noise.
Step 7: Toggle the Preview
Turn the Preview checkbox on and off a few times to see the result of your noise removal. Pan around the image a bit to check the effect of your settings on various parts of the image. Adjust as necessary.

Important notes
- You MUST get rid of noise. Lots of people complain that they’re frightened of "plastic looking" photos if they apply noise removal too strongly. I’m here to tell you to be MUCH more frightened of noise than plasticity. At the end of your editing workflow, when you’re sharpening for print or web, you’ll take care of the plasticity. Your job here in raw is to get rid of noise, period. (More info)
- If the noise was strong, and it was necessary for you to use the sliders aggressively, you must make a frank evaluation of your photo afterwards. Ask yourself if the focus is good enough to keep the photo. If it’s not, ditch it. Read this.
- There are other sliders in the Noise panel of your raw software, which I haven’t discussed in this article. You'll learn about them in The Raw Class.
About terminology
You might have noticed that I always say "noise removal" even though the sliders are named "noise reduction". It wasn't always so. In November 2015 I posted this in my group:
For the longest time, I have been guilty of lazily conforming to Adobe’s poorly-chosen word: "Reduction". This ends today.
If I told my mates I was "reducing" my drinking, they’d laugh at me. "Oh yeah, seven rums instead of eight?" they’d mock.
For too long I’ve ambiguously told you to use "noise reduction" on your photos; because that’s how Adobe named the function. And sure enough, you have reduced the noise. But never enough. Too many people are still leaving noise in their photos, thinking that it’s sufficient to "reduce" it. This is Adobe’s fault, but I’m as guilty as they are, by my verbal compliance.
The word is not "reduction", it’s "removal". Noise is to be removed from photographs. Toning it down a bit is not sufficient. Quality does not begin until noise is gone.
I’ve spent some time editing my blog posts today, to replace all mentions of "reduction" with "removal". As I find time, I will do the same on my site.
And from now on, you won’t see me use that weak, dangerous word again. Noise must be removed, not reduced.