
Cloning in the workflow
All editing can loosely be divided into two categories. In one category are colour and tonal adjustments, using Curves or Levels or Hue/Saturation or Photo Filters or whatever. These edits change the appearance of the pixels in the image, and are done with adjustment layers and masks.
In the other category are pixel edits. These edits actually change the pixels themselves (by moving or copying or blurring or hiding them), and can’t be done using adjustment layers – they must be performed directly to the pixels.
In this "pixel editing" category, we find:
- Noise removal
- Liquifying
- Skin smoothing
- Cloning
- Healing
Noise removal should always be done in Raw, so is a moot point. Liquifying is a special case, which I've addressed in other articles. Skin smoothing, cloning, and healing are the most common pixel edits. This is not a tutorial about those specific methods … I just want to discuss where they fit in the workflow.
Often I’ve seen discussions on forums about when to do pixel editing. Questions like: "Do you do skin smoothing at the beginning or end of the workflow?" or "Should I clone something out as soon as I open the image, or wait until I’ve done other editing?". I’m here to tell you it doesn’t matter. You can do it first, last, or in-between. As long as you have a good layer-based workflow, the timing is of no consequence. You can do it whenever you feel like it.
What’s important is where you do it.
Whenever you’re ready to do some pixel editing, you must make a new layer immediately above the Background layer, and do it on that. Usually, the new layer is a duplicate of the background layer, which you create by selecting the Background layer, then pressing Ctrl/Cmd J:
But sometimes, it might be a plain blank layer:
Blank layers are suitable for cloning, and some of the healing tools. They don’t work with the Patch Tool, though, nor for skin smoothing or noise reduction.
Duplicate layers are suitable for everything, but create a bigger file size. I don’t usually care about the file size (since I have a very powerful computer), and it suits me to use a duplicate layer in most cases, so that my tiny brain doesn’t have to remember which tools will work, and which ones won’t, on a blank layer.
Whether you use a blank layer or a duplicated one, the really important thing is that it’s at the bottom of the layer stack, right above the original image, and below all of the adjustment layers. This is the critical part. All adjustment layers must be above all pixel layers in a good layer-based workflow.
So can you see why I say it doesn’t matter when you decide to do some pixel editing? At any time during your workflow, you can simply return to the Background layer, make the new layer, and do whatever you need to do. If you happen to mess up the editing somehow (which we all do sometimes!) then delete it, make another layer, and try again.
Of course, after the pixel editing, always remember to return to the topmost layer in the stack before creating any new adjustment layers. You can get some unexpected and wacky results if you add new adjustment layers beneath old ones.
Important reminder
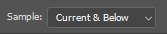
Always check that your Clone Tool (and Healing Brush Tool) is set to "Sample: Current & Below" in the Options Bar.
Some related articles:
- The non-destructive workflow
- The role of masks when cloning
- Fixing skin blemishes
- Layer order for complex edits
- Creamy smooth skin