
Simple dodge and burn tutorial
Dodging and burning is almost as old as photography itself, and it’s a skill that’s just as important in this digital age as it ever was in darkrooms. It’s not complicated, it just requires patience. It works exactly the same in Photoshop and Elements.
Significant confusion surrounds it, though, because Adobe have included tools called "The Dodge Tool" and "The Burn Tool" in the toolbar. You’ve probably seen them, but you must never use them. They are destructive tools – that is, once you use them, you can’t come back tomorrow and fix any mistakes you might have made with them. For the sake of our images and our sanity, we must stick with non-destructive methods.
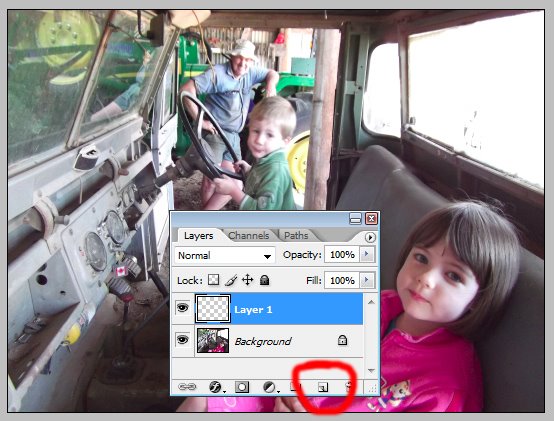
Don’t worry, non-destructive dodge-and-burn is dead easy. Easier, in fact, than the destructive variety. Simply add a new blank layer …
… and change that layer’s blend mode to "Soft Light":
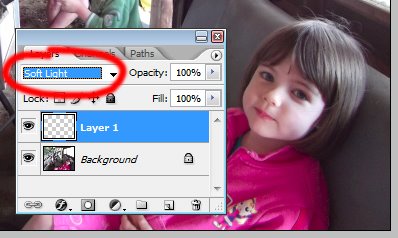
(If more aggressive work is required, use Overlay. But for almost all tasks, Soft Light is fine.)
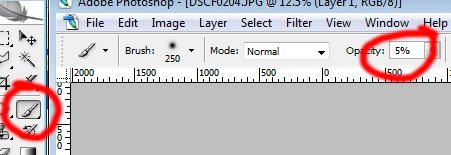
Choose your Brush Tool (B), make sure its blend mode is on "Normal", and drop the Opacity way down. Often 5% works well, but sometimes 2-3% is necessary. Never higher than 10%.
Now simply paint on the layer. Paint white to lighten the area (shown below) or black to darken it. Remember, the shortcut key for changing between the colours you’re painting with is X.
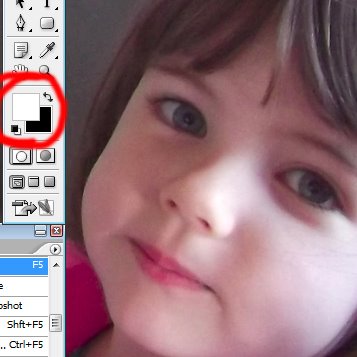
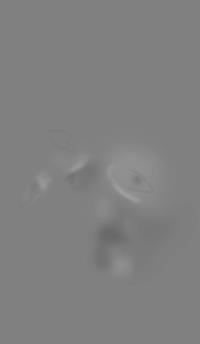
Very gently, paint and paint and paint, to "massage" the light and shadow on your photo. Here, I hope you can see the subtle differences I’ve made to my daughter’s face – under her eye, the bridge of her nose, etc:

For those of you who are curious, I temporarily added a grey layer underneath the D&B layer, so you can see my painting:
That’s all there is to it! A simple technique, with endless applications.
Some extra notes about D&B:
- Earlier I mentioned that Soft Light mode is usually fine, but that Overlay mode is an available option. To add to this – as a rough guide, dodging and burning on Soft Light mode tends to very slightly DEsaturate the area. Whereas using Overlay mode tends to saturate the area. So, that helps me decide which to use. If the area I’m targeting is already quite dull, then I’ll use Overlay mode, to enjoy the added benefit of some saturation. But if the area is already colourful enough, and it’s just the darkness/brightness I want to adjust, then I lean towards Soft Light.
- Sometimes you need to modify the colour of the areas, not just their brightness/darkness. In those cases, you’d need to use the extra layer of The Handyman Method.
- Sometimes only lightening is needed, no darkening. In those cases, this method gives nice control.
- In this quick demonstration, I added the new blank layer above the Background layer, because there weren’t any other layers. But in a normal edit, where you have lots and lots of layers, you can add the D&B layer to the top of the stack, the same as any other adjustment layer.
- When describing the Brush Tool settings, you might have noticed that I only mentioned Opacity. If you’re a habitual user of the Flow setting for your Brush Tool, there’s no need to change. Use whichever setting you’re comfortable with.
- There’s a strange myth, which you might have seen in other tutorials, that it’s necessary to begin with a 50% grey layer to perform dodging and burning. I don’t know how this arose. Maybe it was true, many many years ago. It’s certainly not true now. The blank layer is fine.
- Please note that dodging and burning needs some existing detail to work with. If you have an area that’s complete nothingness (either white or black) you can paint until your arm falls off, it won’t make any difference. For areas that are completely blown out, you’d need a different strategy, like this one for example.