
Photoshop mini-tutorials
Here’s a few bite-sized Photoshop tips that will help your daily post-processing.
Tip 1: Check your image’s profile
You should always be aware what colour space an image is in. Use the "Show" arrow at the bottom of the window.
click on it and choose "Document Profile" from the list of options:
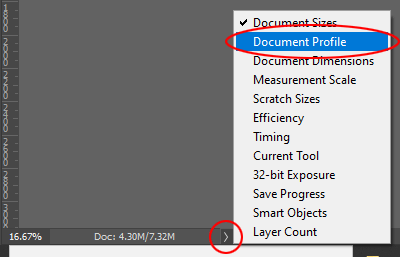
Then, it will show you the colour space of your file:

Once you do this, it should remain that way forever, unless you change it again.
Why do this?
Because every time Adobe rolls out an update for Photoshop, the colour space reverts to default. If you don't notice it, you could be processing photos in the wrong colour space!
Note: Your Info Panel also shows the document profile. If it’s not there, choose "Panel Options" from the panel menu to turn it on. Easy!
Tip 2: A 100% crop
Sometimes we want to post a close-up section of one of our photos on a forum, so that people can analyse the sharpness, or the noise, or some pixel-related problem. This is referred to as a "100% crop".
Here are two ways of doing this in Photoshop:
1. No particular size
(a) Zoom in to 100%
(b) Use the Hand Tool to view the intended part of the image
(c) Choose your Crop Tool, and press the "Clear" button to remove any values in the Options Bar
(d) Crop a section and save it. Easy!
2. A specific size
If there’s a size requirement for your forum or site, you’ll need this method. For example, I use 380px wide images on this page.
(a) Choose your rectangular Marquee Tool (M)
(b) Choose "Fixed Size" as the Style in the Options Bar
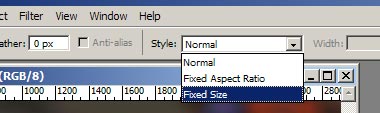
(c) Enter your desired dimensions (I’ve chosen 380×200 pixels)

(d) Click once in the middle of your image to draw the marquee
(e) Click in the middle of the marquee and drag it to the desired spot

(f) Choose "Crop" from the Image menu
(g) Save your file!
Tip 3: About the Hue slider
The various units of adjustment in Photoshop must seem odd to a new user. Some sliders go from 0-100%, others from 0-255, etc.
The Hue slider in the Hue/Saturation dialog is unique, because it ranges from -180 to +180. Strange? Well, try this: 180+180=360. Yep, that’s right – three hundred and sixty degrees in a circle.
Hue is circular. It begins where it ends. Take a look:
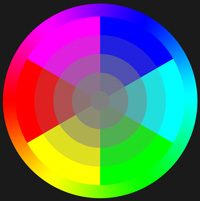
Try it yourself. Open this wheel in Photoshop, then open Hue/Saturation. Start with the Hue slider at -180, and you’ll see that Cyan is on the left. Now steadily move the slider all the way across, and watch what happens – the Cyan does one complete rotation and ends up on the left again!
Tip 4: Taking colour-managed screenshots (PC)
Depending on your monitor, your screenshots can look vastly different from the images they’re meant to capture. This is because screenshots are captured in your monitor’s colour space, not the image’s.
However, the solution is simple.
1. Capture your screenshot
Press your Print Screen button.
2. Make a new blank document
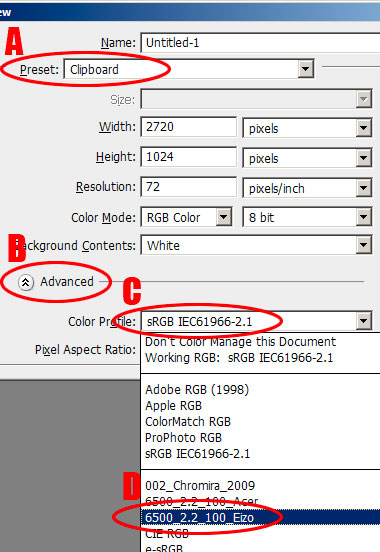
- Photoshop recognises the image on the clipboard (A), and automatically sets the document at the correct dimensions.
- Make sure you can see the Advanced options (B).
- By default, the Color Profile (C) will be a standard image profile. Change it to your monitor profile (D).
Press Ok.
3. Paste your screenshot
Ctrl V.
4. Convert to sRGB
Edit>Convert to profile, and convert the screenshot to sRGB, ready for posting on the web.